
The Security Console is used to control each user's access to the Rapport3 modules and the functions within each module. The security administrator uses this to assign or restrict access to each function and, if required, to individual fields within a function.
For example, some users may not be able to access any of the Human Resources module functions and may not be able to use the Fee Plan and Invoicing functions in the Project Administration module.
A user is granted one the following access rights to each module, function and field:
- full access (add, edit, delete, view and search)
- read only (view and search only)
- unavailable (no access - the tab or module is unavailable)
User Groups
To make the task of assigning access rights easier to manage, Rapport3 users are assigned to groups. The group is then granted access rights. This means that a new user can simply be added to an existing group and automatically granted all the access rights for that group.
The following groups are provided as standard:
- Administrator
- Finance Administration
- HR Administration
- Security Administration
- Project Manager
- All Users
Default access rights are assigned to the module functions for each group. If these default groups are insufficient or the access levels are not correct, they can be modified or new group defined, using the Security Console.
User Guide - Security Console
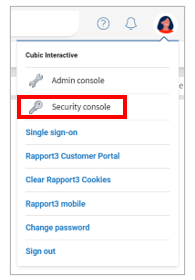
Only authorised users can use the Security Console. It is accessed using the Security Key icon.
*Please Note: If this icon is not visible then you probably do not have access rights and you will need to contact your system administrator to be granted access.
How to turn the Security Console ON
- Click the Security Key icon on the toolbar when clicking on the Avatar on the top right of Rapport3:

- The security console is turned ON and a security key appears alongside each tab option and field:
How to turn the Security Console OFF
- Click the Security Key icon on the toolbar at the top of the Rapport3 window.

- The security console is turned OFF and all the keys are hidden.
Maintaining User Groups
A user group contains a list of Rapport3 users that all require the same access rights to the same set of modules and functions. A user can be a member of several different groups.
- Click the key to turn on the Security Console as above.
- Click on the security key alongside any module or function tab to display the Security Console:

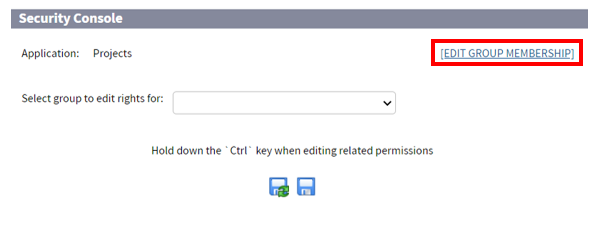
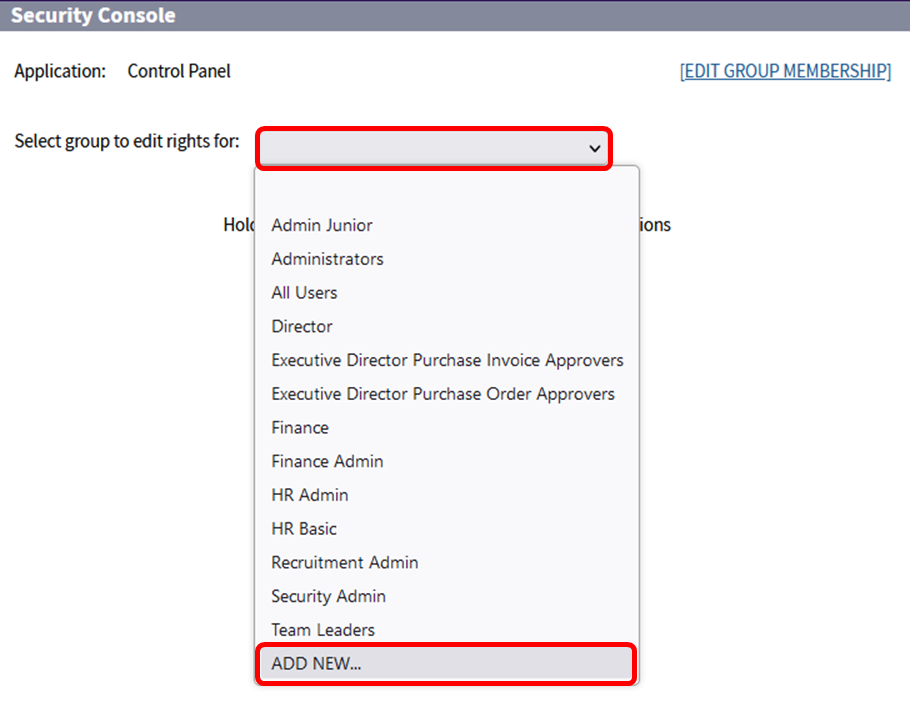
- To add staff to, or remove staff from, a security group or to add a new group click on the [EDIT GROUP MEMBERSHIP] hyperlink:

- This displays a new window with a dropdown populated with all the security groups.

- Click on the dropdown and select the group you wish to update to display the edit dialog. This dialog typically displays two lists of users. The list on the right identifies all the current members of the group. The list on the left displays the users who are NOT members of the group:

- Use the arrow buttons to add or remove a selected user to/from the group, or use the double arrow buttons to add or remove all of the members.
- Click
 to save the changes.
Assigning Access to User Groups
- Click the key to turn on the Security Console.
- To assign the access rights for an entire module, click on the security key icon alongside the module tab.
- To assign the access rights for a particular function, first access the relevant module and then click on the security key icon alongside the function tab.
- To assign the access rights for a particular field, first access the relevant function and then click on the security key icon alongside the field.
- The Security Console dialog appears identifying the module, function or field you have chosen:
- Select the group of users to be assigned access rights from the Select group to edit rights for dropdown list. This displays the access rights options for the chosen module/function.
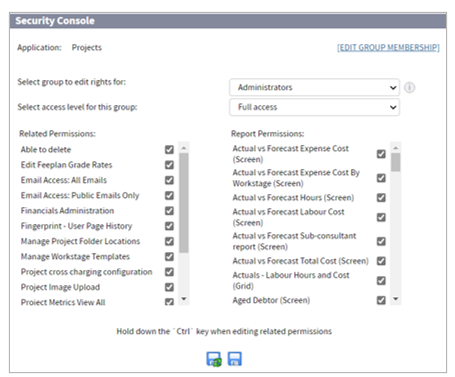
- Select the access level you require from the Select access level for this group dropdown list.
- full access (add, edit, delete, view and search)
- read only (view and search only)
- No access (no access - the tab or module is unavailable)
- If special permissions can be granted for the module or function, click on the Related Permissions you wish to assign.
- If you are assigning access at a module level, you may also be able to assign access to selected reports in the Report Permissions section.

- Click
 to save the changes.
Assigning Access to the Security Console
If a user can't see the Security Console key on the toolbar (when clicking on the Avatar on the top right of Rapport3), they don't have permission. An administrator who currently has access will need to grant this permission. They can do this by following:
- Enable the Security Console by selecting the key next to Security Console.
- Once the Security Console is enabled, you should see the keys next to each section of the system.
- Select the key next to the Control Panel (in the left hand menu pane).

- This will then open the Control Panel Security Console.
- Select the security group you would like to provide access to the Security Console.
*Please Note: All users within this security group will be able to access the permissions granted. You may need to create a new security group to ensure permission is only granted to users required,
- Select the ‘Access Security Console’ option
- Save and Close

- You will then need to turn off the Security Console
- Click the Security Key icon on the toolbar at the top of the Rapport3 window.

- The security console is turned OFF and all the keys are hidden.
- The user will now be able to see the Security Console on their menu.
Related Permissions
- Related Permissions are securable features in the Security Console which enable your system administrator to regulate access to certain Rapport3 module functions to authorised users only.
- For example, the Home module has a function which allows for timesheets to be entered and another function which allows for the authorisation of timesheets. Whereas all users should be allowed to enter timesheets, only their line managers should be allowed to authorise the timesheets.
- When you display the Security Console for a particular module e.g. the Home module, the related permissions for all of the module functions are listed to allow you to grant or deny access to them.

Data Cubes
The Rapport administrator is responsible for granting access to the individual data cubes, based on Rapport security groups. For example, you could grant access to the HR cubes for HR users, and project cubes for project managers. Project runners can be granted a more limited sub-set of project cubes. Bear in mind that access is given to the entire cube, and cannot be restricted to individual records within it.
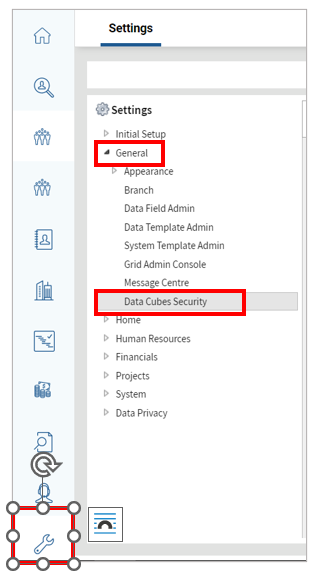
- The security admin tool is in Control Panel > General > Data Cubes Security
- Select a cube to edit permissions for from the dropdown list:

- Set permissions by selecting the Rapport security groups that you want to have access and click save:

- Repeat this process for each cube. This may take a little while to get right, but should be fairly slow-moving after it is set up.